Guides
How to Navigate in the FramerLoc Panel
How to Navigate in the FramerLoc Panel
The FramerLoc panel is designed to feel familiar to any Framer user. Every element has a specific purpose, and this guide walks you through each section so you can work efficiently from day one.
The Top Bar
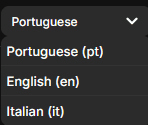
The top bar is always visible at the top of the FrameLoc panel. On the left side, it displays the name of the page you are currently viewing — for example, Home. On the right side, a language selector lets you choose which translation language you want to work on. Switching this selector updates the entire panel to show translations for that specific language.
Clicking the language selector opens a dropdown listing all the translation languages you have added to your project. Simply click on a language to start editing its translations.
The Action Buttons
In the top-right corner of the panel, three small icon buttons give you quick access to the plugin's core utilities.
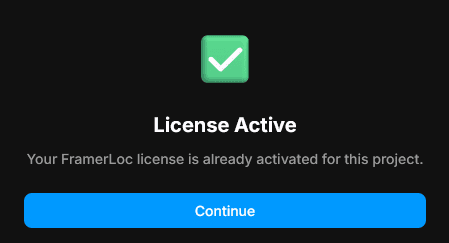
The first button (key icon) opens the License popup, where you can check the current activation status of your FramerLoc license for this project.
The second button (gear icon) opens the Settings popup, which contains all the configuration options for your languages. The third button (question mark icon) is a direct link to the FrameLoc documentation.
The Settings Popup
The Settings popup is the main configuration area for FrameLoc. It is divided into four distinct sections.
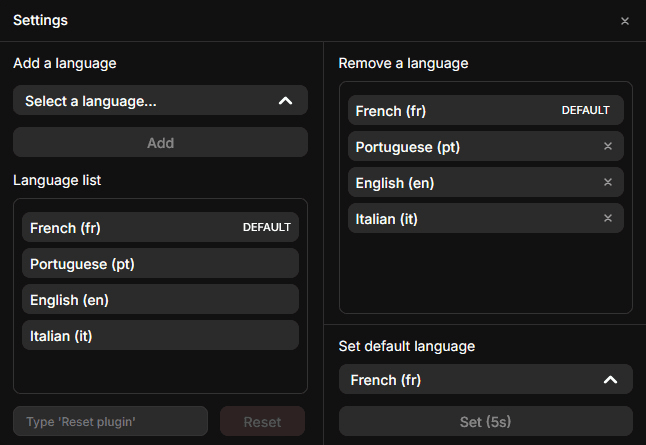
Add a language allows you to select any language supported by FrameLoc from a dropdown and add it to your project by clicking Add. This is how you expand the number of languages available for translation.

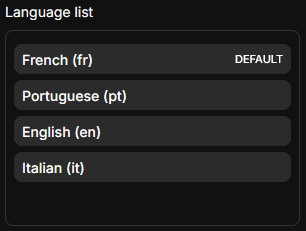
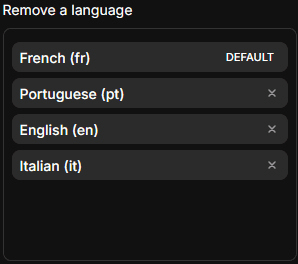
Language list displays all the languages currently added to your project. The language set as default is clearly labeled DEFAULT next to its name, making it easy to identify at a glance.
Reset is a destructive action that completely resets the plugin to its initial state. To trigger it, you must type Reset plugin in the input field and then click the Reset button. After a reset, the plugin behaves as if it was never launched — your license key will need to be re-entered and all configuration will be lost.
Remove a language lists all your added languages with a × button next to each one. To remove a language, double-click its × button. Note that the default language cannot be removed — once set, it is permanently locked in your project.
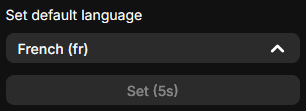
Set default language lets you define or update which language serves as the primary language of your site. Select a language from the dropdown and hold the Set button for 5 seconds to confirm. In most cases, you will only need to set this once during initial setup.
The Pages Panel
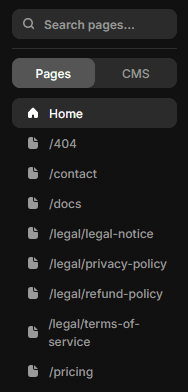
The left section of the FrameLoc panel gives you a full overview of your Framer project's structure. A search bar at the top lets you quickly find any page by name. Below it, a toggle allows you to switch between Pages (static pages) and CMS (dynamic collections). When set to Pages, you see a list of every static page in your project. When switched to CMS, the panel displays your CMS collections along with all their individual pages.
The Translation Panel
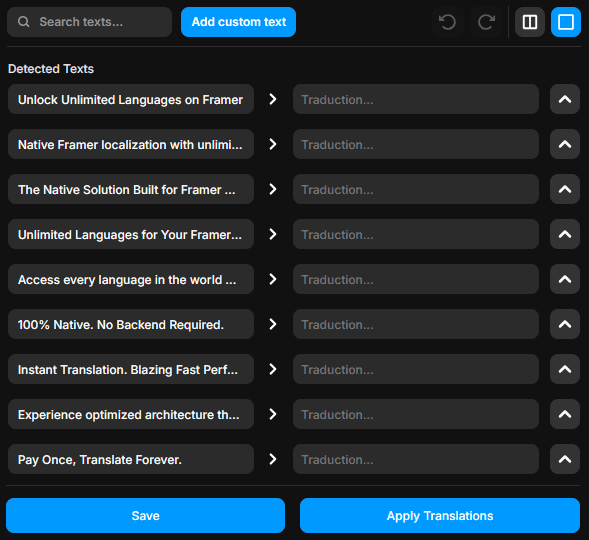
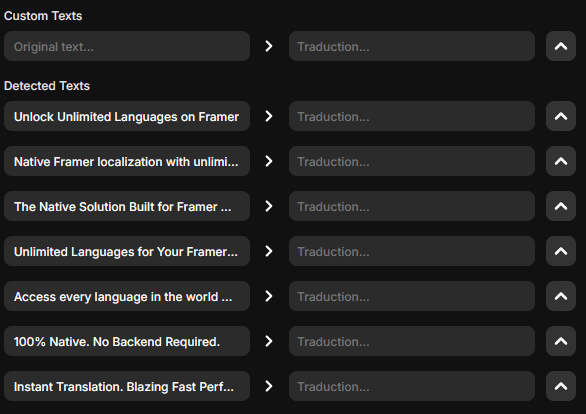
The Translation panel is the heart of FramerLoc. It is where you input, manage, and apply all the translations for your Framer project. Every text layer detected on the current page is listed here, ready to be translated into the language selected in the top bar.
The Translation Top Bar
The translation section has its own dedicated top bar. On the left, a search bar lets you filter through all detected text layers by keyword, making it easy to find a specific string on pages with a lot of content. Next to it, the Add Custom Text button is one of the most useful features in the plugin — it allows you to manually add any text that FramerLoc did not automatically detect, so no content ever gets left behind.
Adding a Custom Text
When you click Add Custom Text, a new translation pair instantly appears at the top of the list under the Custom Texts section. On the left field, type the original text that was not detected by the plugin. On the right field, enter its translation. This pair will then be treated exactly like any other detected text layer.
Undo and Redo
The top bar also includes Undo and Redo buttons, which let you navigate through your save history. You can step backwards to a previous saved state or move forward again if needed — a safety net that makes editing translations risk-free.
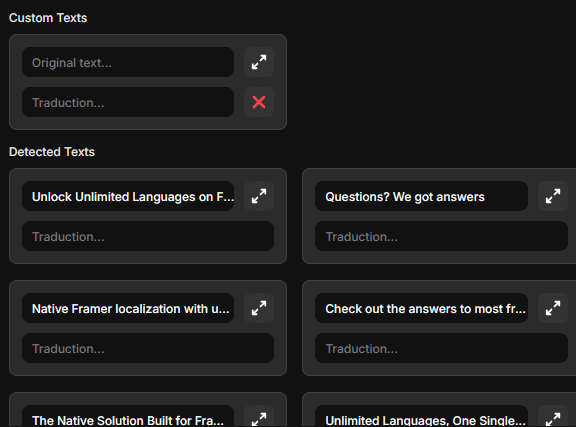
Single Row and Double Row Views
FrameLoc was designed with user experience as a priority, and one of the clearest examples of this is the dual-view system. Two toggle buttons in the top bar let you switch between the Single Row view and the Double Row view depending on how you prefer to work.
The Single Row view displays each text pair on a single horizontal line, giving you a compact and fast-scrolling layout — ideal when you want to work through many translations quickly.
The Double Row view stacks the original text and the translation field on top of each other, giving you more room to read and edit. In this view, you can also delete a Custom Text directly by clicking the red × button that appears next to it — a shortcut that is not available in the Single Row view.
The Full Screen View
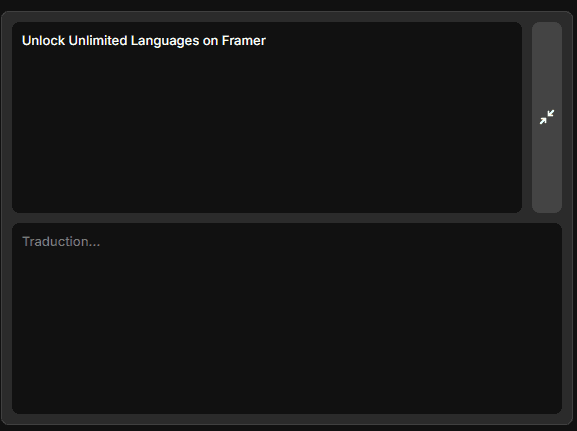
In both views, each text pair features an Expand button on the right side. Clicking it opens the Full Screen view for that specific text, giving you two large editable areas — one for the original and one for the translation. This view is especially useful when working with long paragraphs that are difficult to read or edit in the compact list.
To delete a Custom Text in Single Row view, click the Expand button on the custom text pair to open its expanded view, then click the red × button that appears.

Save Your Translations
Every time you add or edit a translation in FramerLoc, you need to save your work by clicking the Save button at the bottom of the panel. This ensures that all your changes — whether translated text or custom text pairs — are properly stored in FrameLoc's data files. Without saving, your work is not persisted and will be lost if you navigate away.
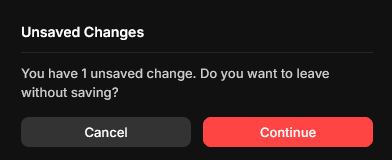
If you try to change page without having saved your current changes, FrameLoc will automatically display an Unsaved Changes warning popup. You can either click Cancel to go back and save your work, or click Continue to leave the page and discard your unsaved changes.
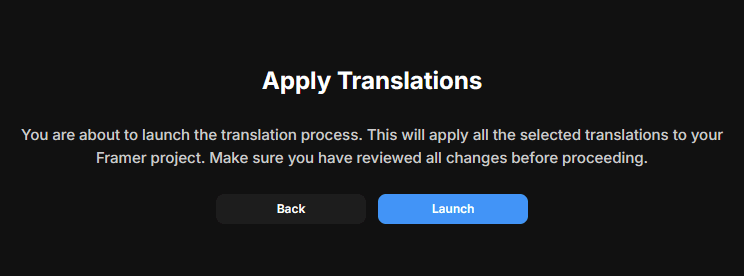
Apply Translations to Your Framer Project
Saving your translations stores the data inside FrameLoc, but it does not yet apply them to your live Framer project. To do that, you need to click Apply Translations. This step is required every time you make a change that needs to be reflected on your site — for example, when you add a new language, when you translate a new page, or when you update existing translations.
Clicking Apply Translations opens a confirmation screen. From here you can either click Back to return to the panel, or click Launch to start the translation process. Before launching, make sure you have reviewed all your translations, as this action will apply all saved changes to your Framer project.
Selecting Which Pages to Apply
After clicking Launch, you are taken to the page selection screen. Here you can choose exactly which pages you want to apply the translations to — you can select all pages at once using the Select all pages toggle, or pick only specific pages from the list. This is particularly useful when you have only added or updated translations on one page: there is no need to re-apply to the entire site, just select the relevant page and click Apply.
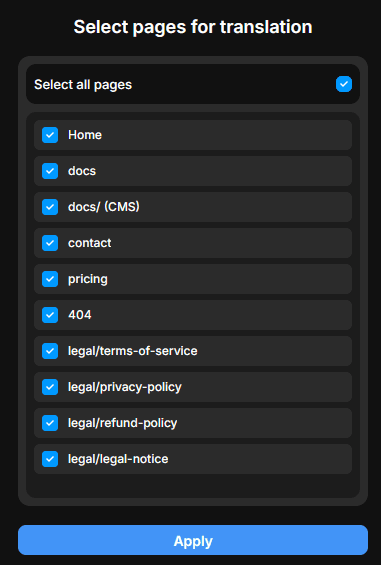
Once you click Apply, FrameLoc will inject a translation engine and a language selector onto every selected page. All that is left to do is place the language selector component on your Framer canvas wherever you want it to appear for your visitors.